
Parallels is a desktop virtualisation platform for macOS similar in function to VMWare Fusion or VMWare Workstation on Windows. It allows you to create ‘virtual machines’ on your computer which are fully self-contained installations of whatever operating system you choose, and I mainly run Windows virtual machines so I can run software used or sold by the company I work for on my Mac.
One feature available with the Pro version of Parallels is the ability to create a ‘Linked Clone‘, which is intended for making duplicates of your virtual machines without wasting precious hard drive space on the base operating system files for the duplicate VM. This can be very useful if you’re needing a quick duplicate to test some software, or change some configuration which might break software in your base virtual machine, but it can come back to bite you if you clone a VM and then keep the clone around for a long time.
I had done exactly this, cloning a VM so I didn’t have to reinstall multiple software packages which were already licensed to the base VM, as I needed to be able to run two different versions of OUR software which can’t co-exist on one PC. Over time I no longer needed the version installed on the base VM, and I had installed other software on the clone but not the base. It had become a bit of a mess.
Here’s where the linked clones can be a pain – you can’t easily ‘unlink’ a linked clone. You will end up needing to keep the base VM around even though you don’t use it anymore, because the linked clone depends on the base for the operating system files and other software files which existed at the point of cloning.
Faced with desperately low disk space on my main workhorse MacBook Pro, I couldn’t put this off any longer. Trawling various forums I came across this post:
https://forum.parallels.com/threads/unlink-a-linked-clone.328621/#post-771400
Here a user known as flackshack helpfully posted a tip for breaking the ties between a linked clone and its source VM. In a nutshell, you can use a hard disk cloning tool to duplicate the virtual hard disk of your linked clone, then delete the original disk file, breaking the link to the base VM. Here’s the key bit in flackshack’s post:
To actually merge the disks into a single disk, you have to do this manually:
- Make a backup copy just in case things go wrong.
- In the configuration for the VM, add a new hard disk.
- Download the Clonezilla ISO: http://clonezilla.org/downloads/download.php?branch=stable (the stable version gave me problems, so I went back to an old version 1.2.3 and it worked great)
- Set the VM to boot from the Clonezilla ISO. (Change the boot order so it only tries to boot from the ISO.) Don’t boot into Windows.
- Boot the VM and use Clonezilla to copy the old disk to the new disk. There are plenty of videos demonstrating this on YouTube.
- Shutdown the VM and remove the old hard disk.
- Set the location of the new hard drive to the correct SATA port (usually SATA 0:1).
- Set the new hard drive as the first in the boot order and make sure it is checked.
- Boot the new VM and enjoy your unlinked clone.
Excellent. I grabbed Clonezilla because I hadn’t used it before and was curious, but you could use any bootable hard drive cloning software you have access to. Clonezilla is free and small, and despite never having used it before it worked first go and was intuitive to use.
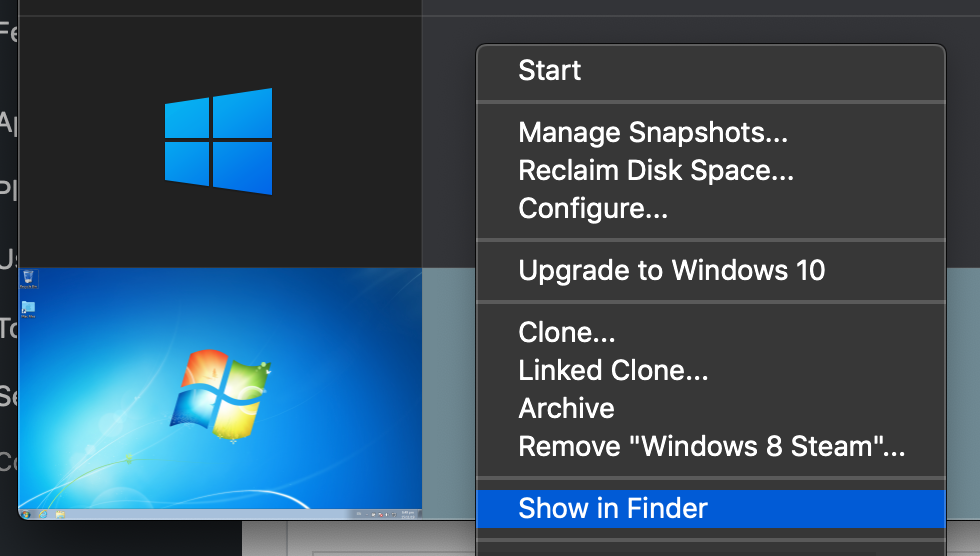
An addition to the above procedure outlined by flackshack, you need to delete the link between the clone and the base image. To do this, first browse to your image file on your Mac’s hard drive. You can do this by right-clicking on a VM in your Parallels Control Center, then selecting ‘Show in Finder’.
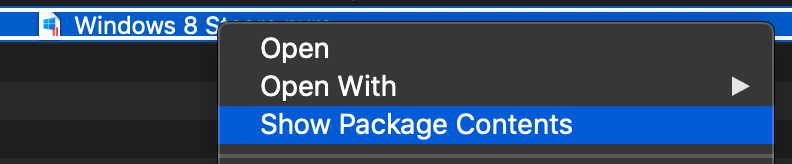
Then right click on your Parallels VM, then select ‘Show Package Contents’.
You will now see all the files which make up your actual Virtual Machine image. Locate the file called “config.pvs”, click on it once to select it, then press cmd+c to copy it, and cmd+v to paste the copy. Your copy will be called ‘config2.pvs’. Right click on that and rename it to config.pvs.backup. This is your backup in case you mess up the next step and break your VM. If everything works okay you can come back and delete this backup when you’re finished.
Now open config.pvs in a text editor. You can likely just right-click and choose ‘Open With -> TextEdit.app’ which is the default text editor in macOS.
You will see an XML file with various configuration settings for your virtual machine. Look for the two lines starting with ‘Linked’ as below. Yours will contain a different series of characters.
<LinkedVmUuid>{24fab1cc-b972-4a12-8084-0a9d09c6176e}</LinkedVmUuid>
<LinkedSnapshotUuid>{24fab1cc-b972-4a12-8084-0a9d09c6176e}</LinkedSnapshotUuid>
Delete the values from those two lines so they are blank like the below:
<LinkedVmUuid></LinkedVmUuid>
<LinkedSnapshotUuid></LinkedSnapshotUuid>
Save the file and exit TextEdit.app. Close Finder and Quit Parallels Desktop. Relaunch, and you will see that the little paperclip icon has disappeared from your formerly linked VM’s label. You have now fully divorced your Linked Clone from its base VM and can delete the base or move it elsewhere.
Thanks to flackshack, whoever you are. You just saved me nearly 50GB of disk space.
