A week ago the Work From Home Gods decided to hit me with a left-right-uppercut combination by taking out my 3 month-old Macbook Pro after a drink-spill incident, then my old five-year-old Macbook Pro which I was rebuilding for my daughter to school from home, and finally my wife’s iPad Pro, all within the space of two days.
This series of unfortunate events left us short on devices for everyone needing to work/study from home, leading me to grab my employer-issued ThinkPad from my office locker where it has sat unused for two years, and sit through many subsequent hours of updates and reboots before I could get back to work.
I am a heavy Evernote user, storing everything from household bills, product purchase receipts, recipes, web-page snips and more on a daily basis. Evernote is my go-to quasi document management system, and I rely upon its search function to pluck any note or web clip from the depths of its cloud storage without notice. Incidentally I use another document management system called Therefore for official work documents, price lists, brochures, contracts and that sort of thing, but Evernote takes everything non-commercial in nature.
I was somewhat perplexed when I went to print something to Evernote, only to find that on Windows this feature seems to be missing. On macOS you can easily add a printer which creates a PDF using the built-in PDF writer, then sends it to any installed App. I had come to rely on this features quite heavily.
After some quick Googles I discovered that Evernote for Windows has an auto-import feature where you can monitor a folder for any supported file type, and then import with various indexing actions. You can set up multiple hot-folders with different indexing outcomes, so this presented a way to print to Evernote indirectly.
There are a plethora of Print to PDF solutions available online including many decent free options (three of which I’ve listed below). Many of these include a save to folder function, allowing you to convert your print to PDF and automatically save the resulting file to folder of your choosing without any further interaction. This is a perfect feed to Evernote’s hotfolder functionality, allowing you to print from any application into your Evernote much faster than the normal drag-and-drop method to add files to a new note.
So how do you set this up?
As it happened, I already had several PDF printers installed on my Windows 10 laptop. I created a new printer (see step-by-step below), and elected to use my Kofax PDF Printer driver (included with Kofax PowerPDF), as it includes a save-to-folder option. The ones below all have this feature too.
Here are a few free ones:
- Foxit PDF Reader (which includes a PDF Printer)
- BullZip PDF Printer
- doPDF
Steps:
- Download and install a free PDF Printer application (one of those listed above or any other which supports a print-to-folder option)
- Create a folder somewhere on your computer and set this as the import folder for Evernote. See this page for instructions on how to do that. Make a note of this folder’s path as you’ll need it later
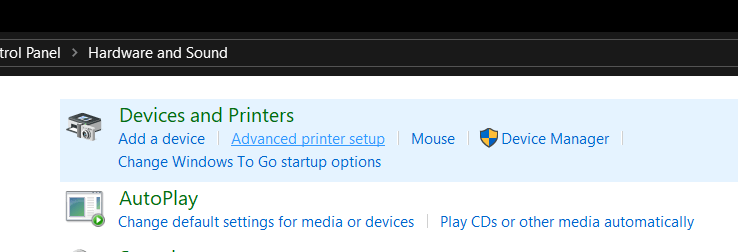
- Go to Control Panel and browse to Hardware and Sound
- Click Advanced Printer Setup
- Click The printer that I want isn’t listed

- Select Add a local printer or network printer with manual settings

- Click Create a new port
- Leave the Type of port set to Local port and click Next
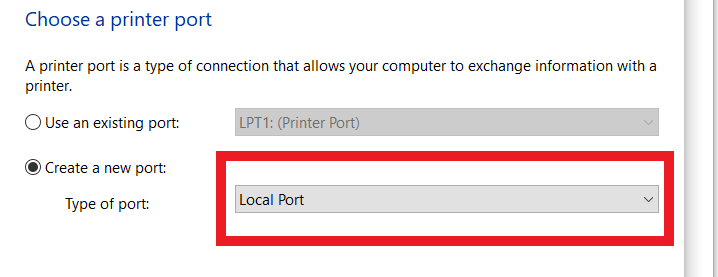
- Give your local port a name – EvernotePrinter for example – and click Next

- Select any printer driver from the list – it doesn’t matter which one as you’ll be changing it in a later step. You can select any of the Microsoft ones for example.

- Click Next and give your printer a name – I suggest Evernote as it will be obvious what this is for

- Click Next and do not share the printer
- Skip printing a test page and finish the wizard
- From Control Panel > Hardware & Sound, click on Devices and Printers
- Find your new printer – Hopefully you called it Evernote
- Right-click on the printer and select Printer Properties
- Select the Advanced tab
- In the Driver drop-down list, change the driver to the PDF Printer App you installed – e.g. Foxit Reader PDF Printer Driver if you installed Foxit

- Click Apply, and you will likely see a few new tabs appear
- Click the Printing Defaults button and a new menu page will appear
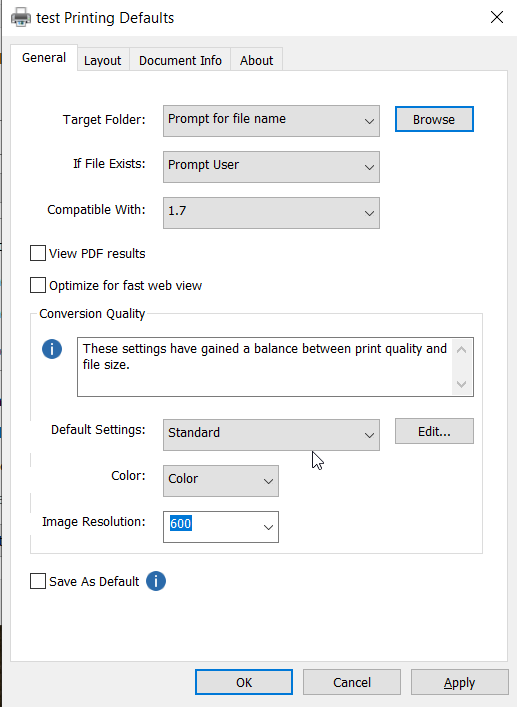
- Look around (each PDF printer driver has different menus, so I can’t specifically guide you here), for an option relating to saving the output file. The Foxit printer (shown above) has this on the General tab, in a field called Target Folder. Here you can set a specific folder to which the PDF files will be saved. Set the output to the same folder you created in Step 2 above
- Deselect any ‘view PDF result’ options in your specific driver settings if present, to make your print to Evernote as silent as possible
- Press OK to save your settings, and you’re good to go. You can now print from any app directly into Evernote as a text-searchable PDF which Evernote will index automatically
